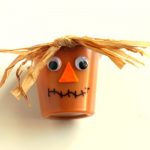
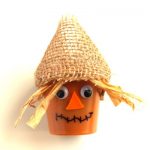
Pumpkins, changing leaves, corn stalks and these easy scarecrow pudding cups are all fun for fall. A simple DIY that turns a butterscotch pudding cup into the cutest scarecrow ever! These are great for Halloween parties or even the kid's table at Thanksgiving.

Table of Contents
ALL ABOUT SCARECROWS
I live in Kansas and we have plenty of farms and fields all around us. Although we are full of farms, I can honestly say I rarely ever see an actual scarecrow that isn't a person dressed up for Halloween.
I don't think kids really know much about scarecrows anymore!
Here are some fun and interesting facts about scarecrows you can share with your kids while they are making these scarecrow pudding cups.
- The original purpose of a scarecrow was to scare crows and other birds away from crops so they didn't eat them.
- Egyptians were the first people we know of who used scarecrows for their wheat crops.
- The clothing the scarecrows wear is actually what works to scare off the birds due to the scent of humans that is on the clothes.
- There are many scarecrow festivals held around the world each year.
- Long ago farmers used to hire young boys to throw rocks at birds to keep them away from the crops. After the great plague, there weren't enough workers so they started using scarecrows.
- The scarecrow in the movie, The Wizard of Oz, is the most famous scarecrow in the world.

SUPPLIES NEEDED FOR SCARECROW PUDDING CUPS
This is a pretty easy list of supplies to gather! I had most of these in my odds and ends basket.
- Butterscotch pudding cups
–you need this flavor for the color
- Orange felt
- Burlap
- Raffia–natural in color
- Wiggly Eyes
- Black Marker–Sharpie's work great
- Scissors
- Hot glue gun and glue sticks


HOW TO MAKE EASY SCARECROW PUDDING CUPS FOR FALL
I love simple craft projects that don't take a lot of time or supplies. It is also nice when my kids can help make the project. Pudding cup crafts have become very popular because they are easy and edible, LOL. What's not to love!
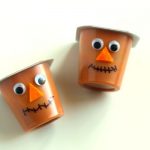
STEP ONE: GLUE ON EYES
Start off by taking one of the butterscotch pudding cups and glue the wiggly eyes on one side. I usually use my glue gun to do this but you could easily use the tiny glue dots
Go ahead and glue the eyes on all the pudding cups.
Please remember to be very cautious about using a glue gun if children are helping. They can burn you and it does hurt! 🙁

STEP TWO: NOSE
Take the orange felt and cut out enough small triangles for all the pudding cups.
The triangle will be the nose of the scarecrow.
Glue it under the eyes pointed side up and centered so it looks like a nose. Repeat for all the cups.
STEP THREE: MOUTH
Grab the black marker and draw a mouth on the scarecrow pudding cups. It is important you use a permanent marker that is fine to medium tip so it doesn't rub off.

STEP FOUR: RAFFIA
Take the natural colored raffia and knot a few pieces together in the middle. You want the length to be about 5 inches after you knot it.
Feel free to trim the pieces to varying lengths for a rugged look.
You want to glue the raffia knot on the edge of the pudding cup above the face. This can be glued with hot glue or a large glue dot. Make sure it is firmly in place.

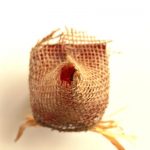
STEP FIVE: BURLAP
Take a piece of burlap that is about 8 inches by 3 inches. Wrap it around the pudding cup lid so that the bottom edge is overhanging the lid a little bit. Glue the back end pieces in place on top of the lid near the back.
Put some glue over the raffia knot and push down on the burlap there so it stays in place in the front too.

SCARECROW PUDDING CUPS PRINTABLE DIRECTIONS
In case you don't have time to make these right now and you want to do it later you can print off these directions via the craft card below.

These easy scarecrow pudding cups are perfect for fall parties or even the kids table at Thanksgiving.
- 4 Butterscotch Pudding Cups
- 1 Orange Felt Sheet
- Natural Raffia
- Burlap
- 8 Wiggle Eyes
- Black Sharpie Marker
- Scissors
- Hot Glue Gun and glue sticks to fit
-
Glue two wiggle eyes on one side of butterscotch pudding. Cut a small triangle out of the felt sheet for the nose. Place the felt triangle (with a pointed side up) center and underneath the eyes. Use the black sharpie to draw on a scarecrow mouth.

-
Next, take a few pieces of raffia and knot them together in the middle. Should be approximately 5 inches in length after knotting. Pieces can be trimmed at slightly varying lengths.
-
Place a good amount of hot glue on the back off the raffia knot and place it on the edge of the pudding cup lid (above the face), pressing firmly so it dries in place.
-
Next, take a piece of burlap (approximately 8” x 3”) and wrap it around the pudding cup lid, with the bottom edge giving a slight overhang to the lid. Use a large dab of hot glue to secure the back end pieces in place on the top of the lid near the back. Next place a dab of glue over the raffia ribbon knot and press the burlap down so it stays in place in the front as well.
-
Repeat for all four pudding cups or as many cups as you need to make.
Remember to always be careful using a hot glue gun around children.
If you loved this easy fall craft idea be sure to check out these fun fall crafts and recipes:
- DIY No-Sew Scarecrow Treat Bags
- Glittery Fall Slime with Leaves
- Fall Leaves Coloring Pages
- Healthy Pumpkin Recipes
Be sure to PIN this craft so you can come back and make it next year!


- Super Easy Buffalo Chicken Wraps Recipe (Healthy!) - April 15, 2024
- Air Fryer Asparagus with Parmesan and Garlic - April 8, 2024
- Free Printable Seahorse Coloring Pages for Kids - April 1, 2024
[…] via […]