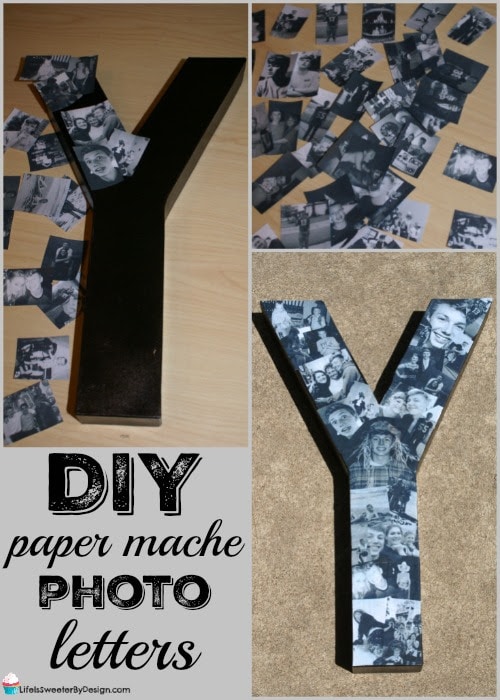
I have seen some awesome examples of personalized photo letters and because I have a major love for mod podge and photographs I knew that I wanted to make some for my son's graduation party! I am going to walk you through how to make DIY Paper Mache Photo Letters and you will see that it is not as complicated as you may think!
Supplies Needed for DIY Paper Mache Photo Letters
Paper Mache Letters in your choice of sizes
Photos printed on plain copy paper
Craft Scissors
Paint Brush
Spray paint or acrylic paint
How to Make DIY Paper Mache Photo Letters
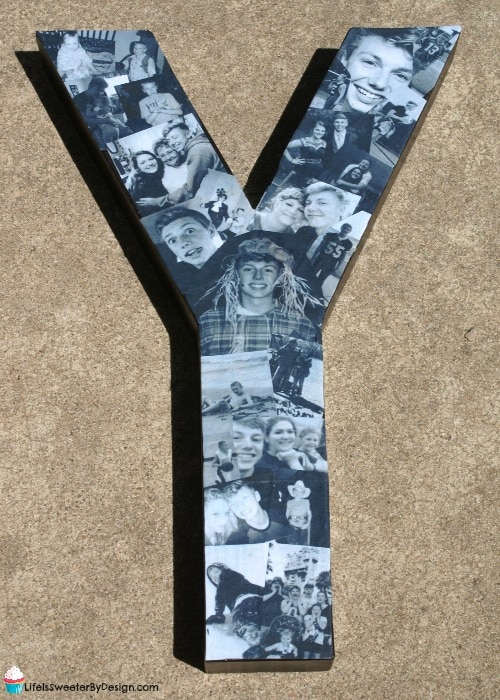
First you want to spray paint your letters. I personally think this is quicker and easier than using acrylic paint, but it is up to you. I painted my letters black because I am using black and white photos for this project. You can paint your letters any color you want!
You need to get your photos printed off on regular copy paper. This can be a time-consuming part of the project depending on how organized your photos are! If you are using photos already on your computer it will save time. I used really big letters….15 inches tall. Even with big letters…you will want your pictures to be printed off small. Here is the process I used to save time.
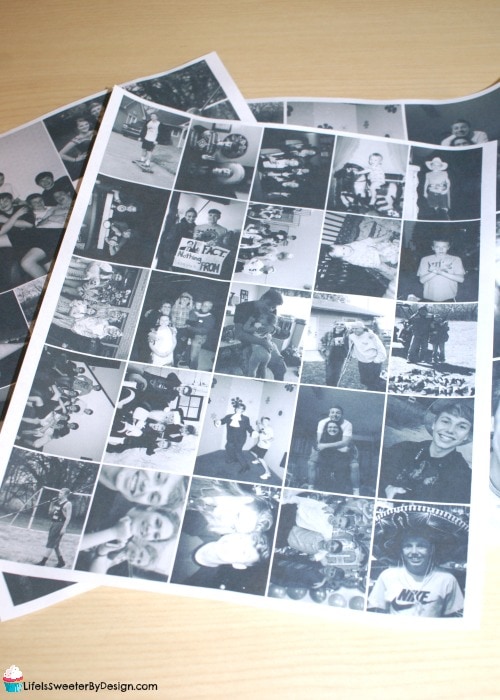
- I picked out all the pictures I thought I might want to use. I put them all into a new folder on my computer. TIP: pick out MORE than you think you will need!
- I went to Picmonkey and clicked on Collage and uploaded all the photos from my folder.
- Click on the layouts tab and choose Square Deal with the 16 or 25 boxes depending on size or you can mix it up and do some of each size. Change your dimensions to 850 x 1100 so it will print off on a regular sheet of paper.
- You can also use the Jigsaw Layout to change-up shapes and sizes of the photos.
- Drag and drop each photo into one of the boxes. When you put your photo into a box you can hover over the photo in the box and you will see EDIT as an option. If you click EDIT you will have the chance to FIT TO CELL or FILL CELL and this may be helpful for some of the pictures.
- Once all the boxes are full of your pictures you will want to click on Background and adjust your spacing so that there isn't much space between photos. I did about 5 for mine.
- If you want your photos to be all black and white or all sepia, etc you will click the EDIT button in the bar above your photos. This will take you into the editor mode.
- You click on the “magic wand” also called EFFECTS and scroll down to black and white and click APPLY. You can adjust it to your liking. You can also choose any other effect!
- Now you can save your page of small photos and print them off. You can make as many of these sheets as you want. I think I did about 5 sheets of photos.
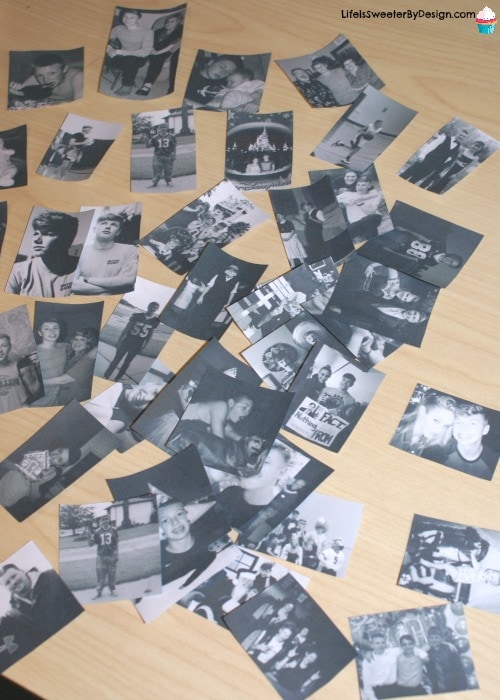
Once you have your photos printed off on plain white copy paper you will want to use your paper trimmer to cut each photo out. I cut mine all out in the shape they printed off in, but you can cut around objects in the pictures if you want!
If the paint on your letter is dry then you are ready to start arranging your photos. This is kind of like a big jigsaw puzzle. I kind of laid them out for a section of the letter until I liked the outcome and then started to glue the photos down. It is okay for paper to hang off the edge because we will deal with that later!

When you are ready to start gluing the photos down you will brush a small amount of mod podge onto the BACK of the photo and slide it where you want it. Smooth it out and let it dry. You can continue to glue photos down and overlap, etc. but only glue the backs at this point.
After this first glue step had dried I had some photos that weren't stuck down as well as I wanted due to the paint on the letter. I reapplied some mod podge to the back of the photos and smoothed again and allowed to dry.
Then I went along the edges and trimmed the photos down nice and evenly along every side with my sharp craft scissors.

Now it is time to go ahead and brush on a thin coat of mod podge over the entire top of the letter. Be sure to watch the corners and sides for drips.
Let this coat dry well and then do one more coat.
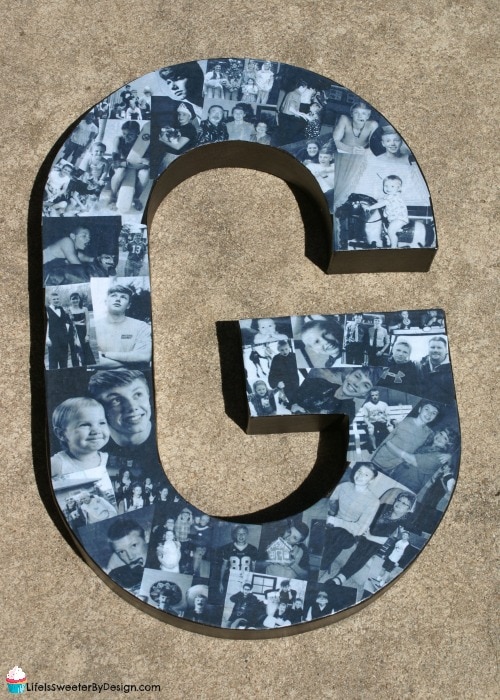
You can put photos on the front of the letters and the sides and even the back if you want. I only did the fronts of my letters because I felt like that was the only part that would really get a good look!
I was thrilled with how the DIY Paper Mache Photo Letters came out! I hope these will be a great keepsake for my son during college plus they were fun to make! Have you made any crafts with paper mache? Be sure to check out some of my other DIY projects! I would love to connect on Facebook too! Head over to my page and check out all the great family friendly posts I share!!

- Navigating the Aftermath of an Accident for Your Family - July 4, 2026
- How To Make Holidays Feel Special When Kids Split Time Between Homes - July 4, 2026
- Our Favorite Brands For Getting Your Kids Beach Ready - July 3, 2026


This is a really fun project. I wonder if my daughters would like these?
I love this. Thank you for sharing.
What is the reasoning behind using plain white paper? Can I used photos printed on photo paper??
The problem with using photos on photo paper is that the paper is too thick and it just doesn’t stick very well. I haven’t had much luck doing it that way. Plain paper just seems to work much better on the paper mache. Thanks for stopping by…hope your project turns out great!
When you said use mod podge on letter do you mean put on top of the photos
Yes.
Hi Jamie! Absolutely LOVE these! Thank you for the great detailed instructions. This will be my first time and I’m doing them for my sons 11 yr olds baseball team of each player with photos from the season. Which type of Mod Podge is best for the paper mache letters? Gloss, Super Gloss, Satin or Matte finish? Thank You So Much!!
Hi Wendie, Thanks for stopping by. I think the Mod Podge is up to your own preference. I think I used Matte on mine because I didn’t want a shiny looking surface. Some people do want it to look glossy though…so it is really just your choice. Sounds like a BIG project…what a great team mom!!! Send me a picture of your final project…I would love to see them!
Hi Jamie,
I have been reading and re-reading the article with hopes I do not miss any steps. My first question – is it ok to print the pictures from computer to printer? Should I use any special printer (i.e. laser printer)? I understand the direction state to use plain copy paper. I have read that using printer paper would turn green after mod podge application and another blogger wrote using a regular printer would cause dye to run when applying mod podge. Have you ever experienced these issues? I do not want to make a mess so looking for some guidance. Plus, I want to make the collage for my sons graduation party on Saturday. Thanks for your instructions, I continue to reference your page.
Last question can wood be used instead of paper mache? Unfortunately, the Micheals I visited did not have paper mache letter or large letters. The letters are approximately 8 inches.
I think wood would work just fine! I have mod podged wood before!
Hi, sorry for my slow response….I was out of town for a few days. I printed all of the pictures off of my laptop to my home printer. It was just an inkjet printer. I used plain white copy paper. I didn’t ever notice any greening…..but I did just text my son to see if it happened after he moved out. 🙂 I am sure you could experience some ink running if you applied mod podge right after printing. I would let the paper dry well. I didn’t have trouble though. I did one light layer at a time and let it dry well in between. Hope it goes great!! Congrats to your son.
No worries I am so glad that you respond. With that being said thank you so much for responding and for the congrats!! Do you think 8 inches is to small? These stand alone and will not over power the table. I just do not know how the pictures will look once I cut them.. If I minimize hopefully photos are not to small.. :o)
I think 8 inches will be fine. It all depends on how your table decor is set up!! I tried to do some different sizes of pictures so that they wouldn’t look too uniform. You don’t want them to be too small. I laid out all my photos on the letter to see how they would look before I started gluing them down. It is nice that the wood letters stand alone. My letters didn’t stand up very well…especially the G, LOL.
Hi Jamie,
Let me start by saying thank you for your responses! I found 12″ paper mache letters at JoAnn Fabrics. They stand up too. YAY!! I spray painted last night and this morning.. Big mistake because I sprayed on paper.. Had to pull it off the paper and spray the back.. I used satin paint. I forgot to message you to get your thoughts on paint finishes.. Hope you will say satin is fine.
I have done the same thing before with a different project. 🙁 It think Satin is fine. It is just a personal preference what kind people like!
I had the xacto knife, but I found it difficult to cut precisely.. I am sure it was me and not the knife. I don’t have perfect edges which is driving me crazy but for the very first time it is not oh so bad. I have to add the mod podge to the front of the letter hoping I do not ruin the project. Is it easy to remove pictures and replace (the not so precise edges makes me want to reprint the photos)
Thanks again for all of your help!!!
I didn’t try to remove the photos once I had them glued down. I think it would probably be hard…. Remember DIY doesn’t have to be perfect!!! I am sure your son will love the effort you put in. 🙂
Hai Jamie,
This is a nice project!!
I have a question.. Instead of Paper Mache Letters can I use DIY 3D cardboard letters(https://www.youtube.com/watch?v=UEhv_rj1RxY)??
Or is there any necessity for Paper Mache Letters in this project?
Thanks in advance,
Sritha.
I think those cardboard letters would work just fine. Let me know how your project turns out!
Sure Jamie! I haven’t done yet.
I have one more question though..
Can I print color pictures on paper instead of selecting black&white as you did and do it?
Would it do any bad in appearance ?
Thanks,
Sritha.
Hi Sritha, I think it is just personal preference!
What size letters did you use?
I used large letters….maybe around 12 inches or so.
I am sure if I read more comments someone already asked, but…. I already have actual pictures that I was going to display on poster board.. Can I still put them on the paper mache letters???? Thanks, will be doing this VERY soon!
I would not suggest using actual photos that are on photo paper. The photo paper is too thick. You could just make copies of the pictures on regular copy paper for this project to work really well.
Thanks for your quick reply!!!
I have made about 25 of these letters since my initial question February 2017. I have used paper mache, wood and mdf… of all different sizes… from 6” tall to 16”. And… I have used real photos (both color and b&w). I use a thick layer of modpodge under ea photo and about 4 coats on top. The images are crisp and clear and look amazing. The hardest thing is getting the photos the right size. 4×6 prints are too large. The only place I have found that prints “minis” is cvs… using the in- store machines. I have not had success using home photo paper.
I wanted to say a huge thank you to Jamie… thank you for sharing this idea. It is now my go to gift!!
Thanks for the information and kind words Cathy! One thing I did on getting the smaller photos was to make collages in Picmonkey. You can do collages of all different kinds and sizes and then I printed them out on paper, but you could also have it printed on photo paper! Would love to see some of your creations!
o que é mode podge?
Hey Jamie. I was thinking about doing these for Christmas presents for my family so I have a few questions. I was looking at getting all of the materials you said to use for the project and I saw the paper trimmer. What is that for? Also, do you think the 16 oz of mod podge jar will be enough for 7 letters? What paper mâché letters did you use and where did you buy them from? This has been very helpful! Thank you!
I used the paper trimmer to cut down the photos so they would have nice sharp lines…using scissors will work, but may not be as sharp. I think 16 oz will be plenty. Most craft stores will have the letters…if they are paper mache they should work! Good luck!
Hi Jamie! What is the best paper mâché letters to use and where do you buy them? Thank you!
Well I don’t know which are the best…I just used what I found at the craft store. I bought mine at Hobby Lobby, but typically you should be able to find them at Michaels, Joann…or even on Amazon!
Thank you!
To. I’m making these for my daughter’s high school softball coaches and they turned out amazing the only issue I had is trimming off edges. So I used a finger nail filer to go around edges and reprinted around edges and worked fine..thank you for tips
I didn’t start this project yet but I am planning on doing it for my friends birthday gift. I have a question for the letter. I have been reading the comments but I am confused on what to get for the letter. Which letter is recommended to get a paper mache one or a wood one and is a 12 inch the size you used to fit all those photos on?
This tutorial was completed on a paper mache letter. I think it would work the same for wood…but haven’t done it on wood myself. The letter I used was larger than 12 inches…probably more like 18 inches. The number of photos will depend on letter size and how large you make the photos themselves.
Thank you. Also I am only making one letter, would an 8 ounce of mod podge be enough?
Yes I think so. A little bit goes a long way!
Does pic monkey require a paying membership to upload the pics like you did to one sheet in order to print at home?
They have a free trial!
I am really struggling with this pic monkey on my Mac. None of the options you talk about are there-like “fit to cell”… I can’t drag and drop anything.. I select a picture from the hub, one at a time, and it is big on the screen and I am having to click on the corner of a pic and drag it down to size and put it in the template. It is all warped inside the cell. If I try to change the size, it wants me to use a number for pixels, rather than a measurements. I can’t even find a button that allows me to print what i have so far… or where I change the dimensions to 850×1100 so it will print on paper. I’m so frustrated. The menu bar that you talk about isn’t the same… maybe it’s a newer version…but not easy-and once I fill this template, I have no idea what to do with it, since I can’t find a print button.
I am sorry you are having issues. I don’t use a Mac and don’t know how it works for Mac. Picmonkey has made a lot of updates to their website since I wrote this post several years ago. They have a great customer support team and could probably help you via email.
Hi Jaime, I was wondering if you have to paint the letters? Can I leave them the paper mache letter as they are or will the mod podge soften them?
I think it is just up to you. The modge podge shouldn’t damage the letters if they are unpainted. It should dry just fine.
How big is the letter G and the letter Y what’s the sizing ?
The letters I used were pretty big…probably 2 feet tall or so.
About how many photo should I print to cover 4 medium sized letters? I’m spelling LOVE
I honestly don’t know Beth. It will take more than you think!
Jamie,
When I am finished putting the mod podge on over the photos can I put resin on top of that to protect it as well?
I have never done it so can’t say for sure…sorry!
Hi. I have a large wooden letter M that I painted witg seni gloss paint. Could I use Elmers glue instead of Hodge Pod
Has any one tried spray painting and using the big galvanized letters??? I can’t find big enough letters
I’m glad these projects are still up. I did one for my grandson’s high school graduation and it was fun. I painted the letter with his school colors – one color on the inside of the letter (D) and the other color on the rest. It came out pretty good; imperfectly perfect. Thanks!