 Do you want a special souvenir from your trip to Disney World? You need to make a DIY Disney Autograph Book! There are lots of ways to make your own DIY Disney Autograph Book….I am going to show you how I made ours!
We went to Disney World about 10 years ago and we bought the Disney Autograph books that were available. They worked fine, but aren't personalized and are really nothing special. So when we decided to go back to Disney World this past fall I knew that I wanted to make special autograph books for my 2 younger kids who would want autographs!
I looked at all sorts of ideas for making these DIY Disney Autograph Books. I wanted something simple that was easy to customize. I also wanted to be able to add pictures to the book later to put with each autograph.
Supplies Needed for DIY Disney Autograph Book
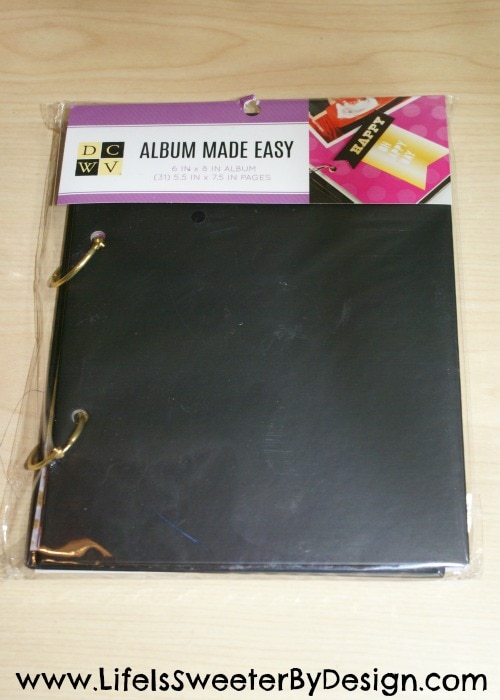
DCWV Album Made Easy Kit

Brush to apply Mod Podge
Large Letter Stickers and/or you can cut letters with your cutting machine


Large 5 x 8 inch Blank Index Cards
Scissors
Hole Punch
How to Make a DIY Disney Autograph Book
I started with the DCWV Album Made Easy Kit from Joann. This kit comes with lots of cute papers for the inside of the album…I just put those aside to use for other projects. I mainly wanted the hard black chipboard covers that were already hole punched and the gold circle rings.
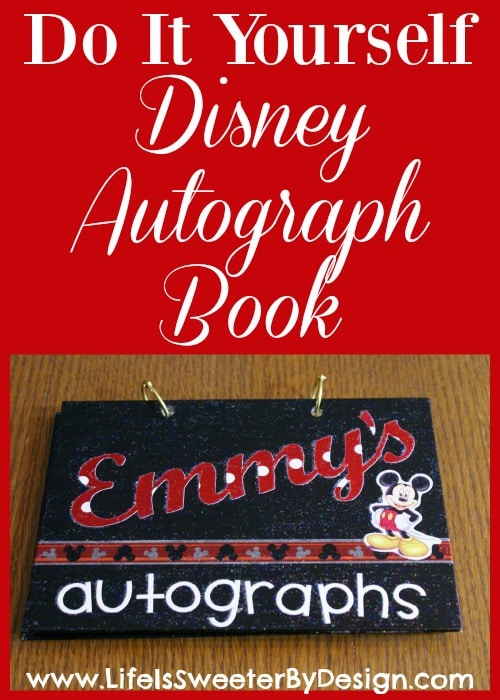
You can customize your Disney Autograph Book anyway you want! I decided to keep mine in line with the Disney colors of black, red and white.
I picked out some red cardstock with white polka dots to make my large letters for the name. I knew that the album cover was 8 inches wide so I estimated how large I wanted my letters and cut them out with my electronic cutting machine. You can always use large letter stickers for your name for a quicker process!
I decided to use smaller white letter stickers for the word “autographs” on the front cover.
I got some adorable Disney Washi tape from Joann and it made a cute accent for the Disney Autograph Book! I also used a Mickey Mouse sticker for another embellishment. You can get as wild and crazy as you want with your book!
Once you have your words, Washi tape and any other embellishments securely onto your cover….now you will paint the whole cover with a light coat of Mod Podge Sparkle. I let it dry good and then gave it another coat. Then you will flip them over and do the same to the back side of the front cover and to both sides of the back cover! See how pretty the sparkles are from the Mod Podge Sparkle!! 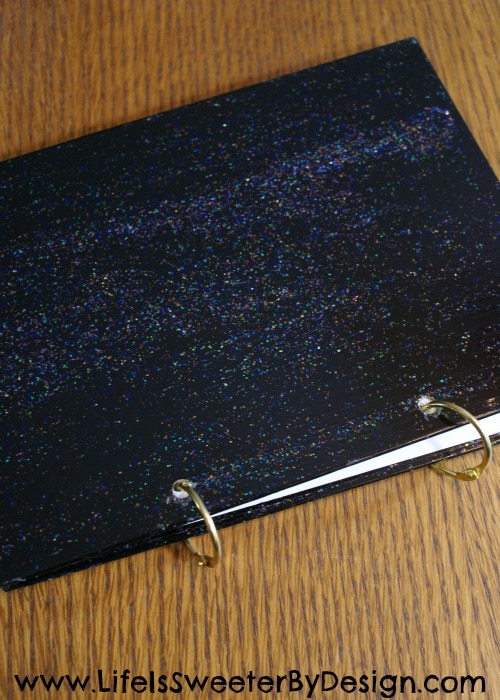
While the Mod Podge is drying you can take out your large 5 x 8 inch index cards. These are a little too big for this album…so I cut off about an inch from each card with my paper trimmer.
You will need to hole punch your index cards to match the holes in the front/back covers of your album. Once your album covers are dry…you can put your index cards in and secure them with your gold rings! 
What I Love About My DIY Disney Autograph Book
The circle rings make this a very easy album to work with. It was so easy to just flip it open to a blank card and grab an autograph at the parks.
I love the large index cards because once I get our pictures printed…I will put a picture of my child getting that autograph on the index card next to the autograph! This makes it so fun for your child to look through and see the picture and the autograph!
These books are personalized with my child's name….and kids LOVE personalized stuff!! It makes the PERFECT souvenir from a magical vacation!
If you decide to make your own DIY Disney Autograph Book I would love to see a picture of it! If you are planning a trip to Disney World be sure to check out my other posts about Disney!

- Must-Have Safety Equipment Every DIY Enthusiast Should Own - July 25, 2026
- How Understanding People Builds Stronger Families - July 25, 2026
- Does Liquid IV Work? A Clear Look at Benefits, Ingredients, and When It Makes Sense - July 24, 2026