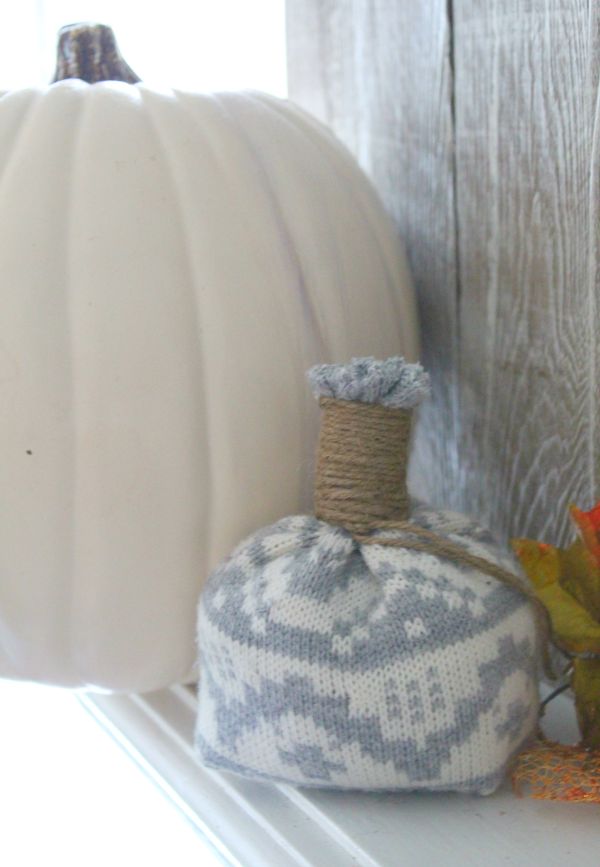
What could be cuter than this Easy No Sew DIY Sweater Pumpkin for your fall decorating? The best part is that this is an upcycled sweater craft and is a great way to reuse something you no longer wear. Turning an old sweater into a cute pumpkin for fall is a quick and easy craft project.

WHAT IS AN UPCYCLED SWEATER PROJECT?
You would be shocked at how many great things you can make out of old sweaters! I got started using old sweaters several years ago when I made some adorable sweater boot cuffs. Such a simple but functional project.
There are so many ways to upcycle old sweaters your mind will blow! I really regret all the sweaters I have gotten rid of in the past. SIGH.
There are sweater pillows, ugly Christmas sweaters that you make as gaudy as possible, to making a precious fall wreath out of a sweater. The options are unlimited and the outcomes is always super cute.
It is also nice to know you are reusing something and doing good for the environment.

SUPPLIES NEEDED FOR A DIY SWEATER PUMPKIN
The only downside to making a DIY sweater pumpkin is that once your friends see it they will want you to make them one too! It may be fun to have a sweater pumpkin making party and just do it together! It is so easy anyone can learn.
- Sweater (your choice of pattern and color)
- Rice
- Cotton Balls or Cotton Batting
- Twine

- Scissors
- Hot Glue Gun and Glue Sticks

HOW TO MAKE A DIY SWEATER PUMPKIN
It is surprising how some sweater colors or patterns may not seem very “fall-ish” but once you make them into a pumpkin…the results do look like autumn. This sweater didn't strike me as an overly fall type pattern, but the final results were perfect.
You can use any old sweater you have in your own closet. If you don't have anything then head to your nearest thrift store or ask your friends if they have anything. See…there are some good reasons not to KonMari everything you don't use all the time, LOL.
STEP ONE: CUT SLEEVE
Start off by cutting a sleeve off the sweater you picked. You need to have a 6-inch segment of sweater.
STEP TWO: FOLD ENDS
Take one end and carefully fold the ends inward like you are wrapping up the ends of a gift.
Add some small dots of hot glue to the flaps of the sweater before pressing inward so they are secured. Let the hot glue dry.

STEP THREE: ADD RICE
You now have an enclosed “sock” shaped sweater. It is time to add a few cups of dry rice to help weight the bottom of the pumpkin down so it looks like a pumpkin.

STEP FOUR: ADD COTTON
Now you can add some cotton balls or batting on top of the rice. This will help you create a more realistic pumpkin shape.
Just keep fluffing until you get the shape you want.
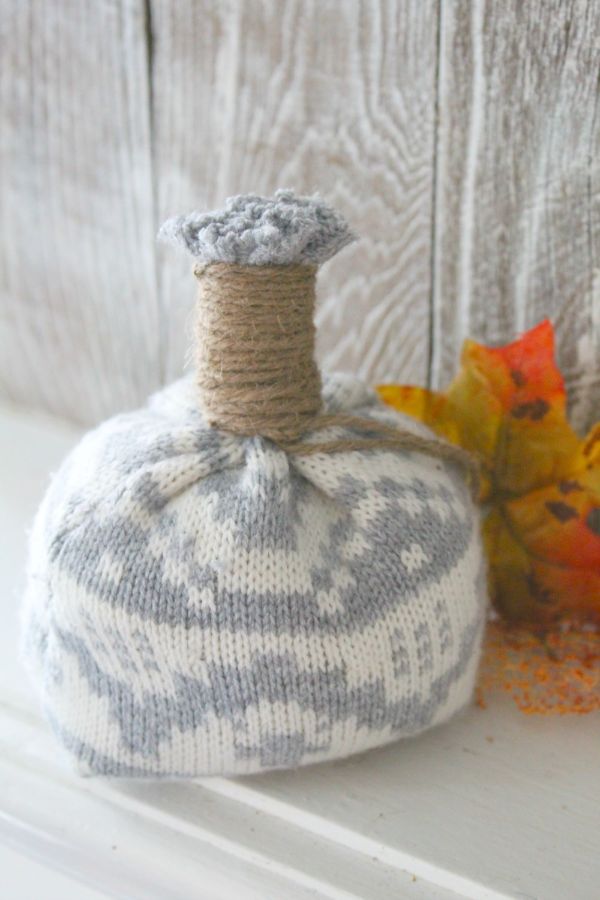
STEP FIVE: SECURE TOP
It is time to secure the top of the pumpkin with twine. Pull the remaining sweater fabric up and tie it off with twine very tightly. Tie the twine in a knot so it is secure.

STEP SIX: MAKE STEM
Now take the twin and start wrapping it around and around the fabric top so that you start to see the stem coming into view. You want the stem to be about 1 inch.
When your stem is the right size stop wrapping the twine around and glue the end into place. Cut off any remaining sweater that is sticking out the top.
You can do any additional fluffing or shape changes now if desired.

HOW MANY NO SEW DIY SWEATER PUMPKINS WILL YOU MAKE?
These DIY sweater pumpkins are so easy to make it is hard to stop. They also make great and inexpensive gifts!
So who will you make an upcycled sweater pumpkin for? If you want some more fun ideas for fall check these out:
- Easy Scarecrow Pudding Cups for Fall
- Ghost Halloween Popcorn Balls
- DIY No Sew Scarecrow Treat Bags
- Halloween Planter
Be sure to PIN this adorable craft so you can come back and make it again next year!


- Navigating the Aftermath of an Accident for Your Family - July 4, 2026
- How To Make Holidays Feel Special When Kids Split Time Between Homes - July 4, 2026
- Our Favorite Brands For Getting Your Kids Beach Ready - July 3, 2026


