This easy DIY twine wrapped letter craft is a great way to create some inexpensive home decor items. Jute looks good with so many different decor styles and is easy to customize. Pick a letter and read on to get started crafting!

IS JUTE AND TWINE THE SAME THING?
I used to wonder if jute and twine were the same thing and know that other people may have the same question.
There are different types of twine and one common twine is sisel twine. It is more industrious and is used in agriculture, landscaping and industrial applications. This is a thicker twine and won't work as well for crafting.
The best twine for crafting is a jute twine. It is a natural vegetable fiber twine and is perfect for all sorts of arts and crafts.
SUPPLIES FOR A TWINE WRAPPED LETTER
This project takes surprisingly few supplies and that is how I like it! You can embellish your letter as much or as little as you like. This letter has a very modest embellishment of some sprigs of baby's breath.
- Cardboard (or a store-bought letter that is paper mache or wood)
- Pencil
- Scissors
- Glue
- Jute Twine
- Embellishments like flower springs, etc.

HOW TO MAKE A TWINE WRAPPED LETTER
It is nice to make crafts with things we already have around the house. The fewer items that have to be purchased the better off our crafting budgets are going to be.
Instead of purchasing a letter that is made from paper mache or wood…I decided this could be made from cardboard. It is nice to do a recycled project sometimes.
This is totally optional and I will NOT judge you if you want to purchase a letter at your local craft store! If you do purchase a letter you can skip to step three.
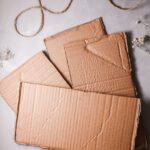
STEP ONE: CUT CARDBOARD
Take your cardboard and a pencil and trace a capital letter on it three times.
I just went to Word and typed my letter and increased the font so it was the size I wanted it to be. I used that has my template to trace.
Cut each of the letters out of the cardboard with your scissors.

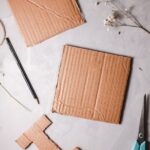
STEP TWO: GLUE CARDBOARD
Now you want to glue the 3 letters together so you have one thick letter.
There are tons of glue options. I used a very light amount of E6000 which is an ultra-strong adhesive.
Let the glue dry so the letters are securely together.

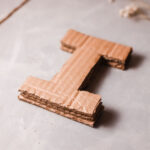
STEP THREE: WRAP LETTER
Now it is time to start wrapping the letter with twine.
I used plain jute twine for this DIY project, but you can definitely use a colored twine or a combination of both!
Start off by gluing the end of the twine to your letter. I like to glue mine in the back. Let the glue dry.
Wrap the twine around the letter snugly, but not so tightly that the letter warps or bends. Make sure to wrap each layer of twine closely so you don't see between the layers.
Once you have wrapped the whole letter glue the end of the twine to the back of the letter securely.

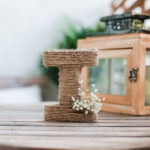
STEP FOUR: EMBELLISH
Some people like to keep their decor very simple and not add any extra decoration to it. If that is how you like things then your project is DONE!
If you like a little bling feel free to start adding embellishments at this point.
Usually, a small grouping in one corner of the letter looks the best.
Here are some embellishments that look great on letters wrapped in jute:
- Burlap Fabric Roses

- Lace Burlap Flower Embellishments
- Artificial Baby's Breath Stems
- Mini Sachet Rose Stems
- Butterfly Embellishments


PRINTABLE INSTRUCTIONS FOR A JUTE WRAPPED LETTER
You can print these twine wrapped letter instructions off in case you can't make this craft right this minute. Just click the print button on the instruction card below.

This DIY Twine Wrapped Letter craft is easy and is a wonderful home decor item.
- 3 pieces Cardboard
- 1 Pencil
- Glue
- Twine
- Embellishments as desired
-
Gather your materials.

-
Draw the letter you want to make into one of the cardboard pieces and cut it out. Use it as a template so you can draw the same letter into the other 2 cardboard pieces. Cut them out as well.
-
Glue the 3 letters together and let them air dry completely.
-
Glue the twine to the letter to secure it. let it cool completely too.
-
Wrap the twine around the letter tightly but not so tight that the cardboard folds. Once you get to the end of the letter cut the twin and glue it to the back side of the letter.
-
Decorate with the flower sprigs or other embellishments, intertwining them into the twine. You can also secure them with glue too.


You can use colored twine or natural twine.
If you love easy DIY projects be sure to check these out:
- Button Picture Frame
- Starbucks Hot Cocoa Ornament
- DIY Paper Mache Photo Letters
- Wooden Spool Ornament
Be sure to PIN this for later and if you like this craft please leave a comment and rating!


- Tips for Keeping Your Home's Plumbing Running Smoothly - July 15, 2026
- Early Facial Aging Solutions: When a Facelift Becomes an Option - July 15, 2026
- What to Expect From Your First IV Therapy Appointment - July 15, 2026


One Comment